
You end with Notifuse running on your server, an administrator account, a workspace and an email provider that has sent you a test email.
Before you start
- A server with Docker Engine 25.0 or newer and Docker Compose v2.24 or newer. Check with
docker compose version. - Port 8081 reachable from your browser. Notifuse serves the console and the API there.
- An SMTP server for the instance’s own emails: sign-in codes and invitations. Without it you can’t sign in.
- Credentials for the email provider your workspace will send with: an SMTP server, or an Amazon SES account with a verified sender. It can be the same SMTP server.
Install and send
Download the Compose file and create the .env
Run this in an empty directory:
mkdir notifuse && cd notifuse curl -fsSL https://raw.githubusercontent.com/Notifuse/notifuse/main/compose.yaml -o compose.yaml test -e .env || cat > .env <<EOF SECRET_KEY=$(openssl rand -base64 32) DB_PASSWORD=$(openssl rand -hex 24) EOFSECRET_KEYencrypts your stored data. Compose refuses to start without it, and Notifuse refuses a key shorter than 32 bytes. Keep a copy of the.envfile: a new key leaves your stored data unreadable.DB_PASSWORDis the PostgreSQL password. Without it, the database usespostgres.Warning
Compose names the database volume after this directory. Keep its name: in a renamed or moved directory,
docker compose up -dstarts a new installation on an empty database.Start Notifuse
docker compose up -dThis pulls the Notifuse image and starts it with its own PostgreSQL. The console and API listen on port 8081. PostgreSQL is reachable from the server itself only, on
127.0.0.1:5433.To follow the server log, run
docker compose logs -f api.Warning
Notifuse serves plain HTTP. Before you point a domain at it, put a reverse proxy with TLS in front of it. When that proxy runs on the same server, set
HTTP_BIND=127.0.0.1in.envso port 8081 only answers on the server itself, then rundocker compose up -dagain. Installation covers this and everything else: environment variables, standalone Docker, upgrades and the secret key.Fill in the setup wizard
Open
http://<server>:8081. Until setup is done, every page leads to the wizard, Set up your Notifuse instance. It is one page with five panels:- Administrator: one or more Root email addresses, which sign in as root, and the API endpoint, prefilled with the address of the page. Keep that address for now: Changing the domain covers the move to your HTTPS domain later.
- System email delivery (SMTP): Host, Port (587 by default), Use TLS, Username, Password, From email and From name. Notifuse uses this server for sign-in codes and invitations only. Click Test connection to check it.
- Updates and telemetry: both are on by default. Turn them off if you prefer.
- Single sign-on (OpenID Connect): optional. Skip it for now.
- SMTP bridge: optional. Skip it for now.
A setting you already gave in
.envshows locked, with the name of its variable.Click Complete setup. The server restarts to apply the configuration, which usually takes a few seconds. When Notifuse is ready shows, click Go to sign in.
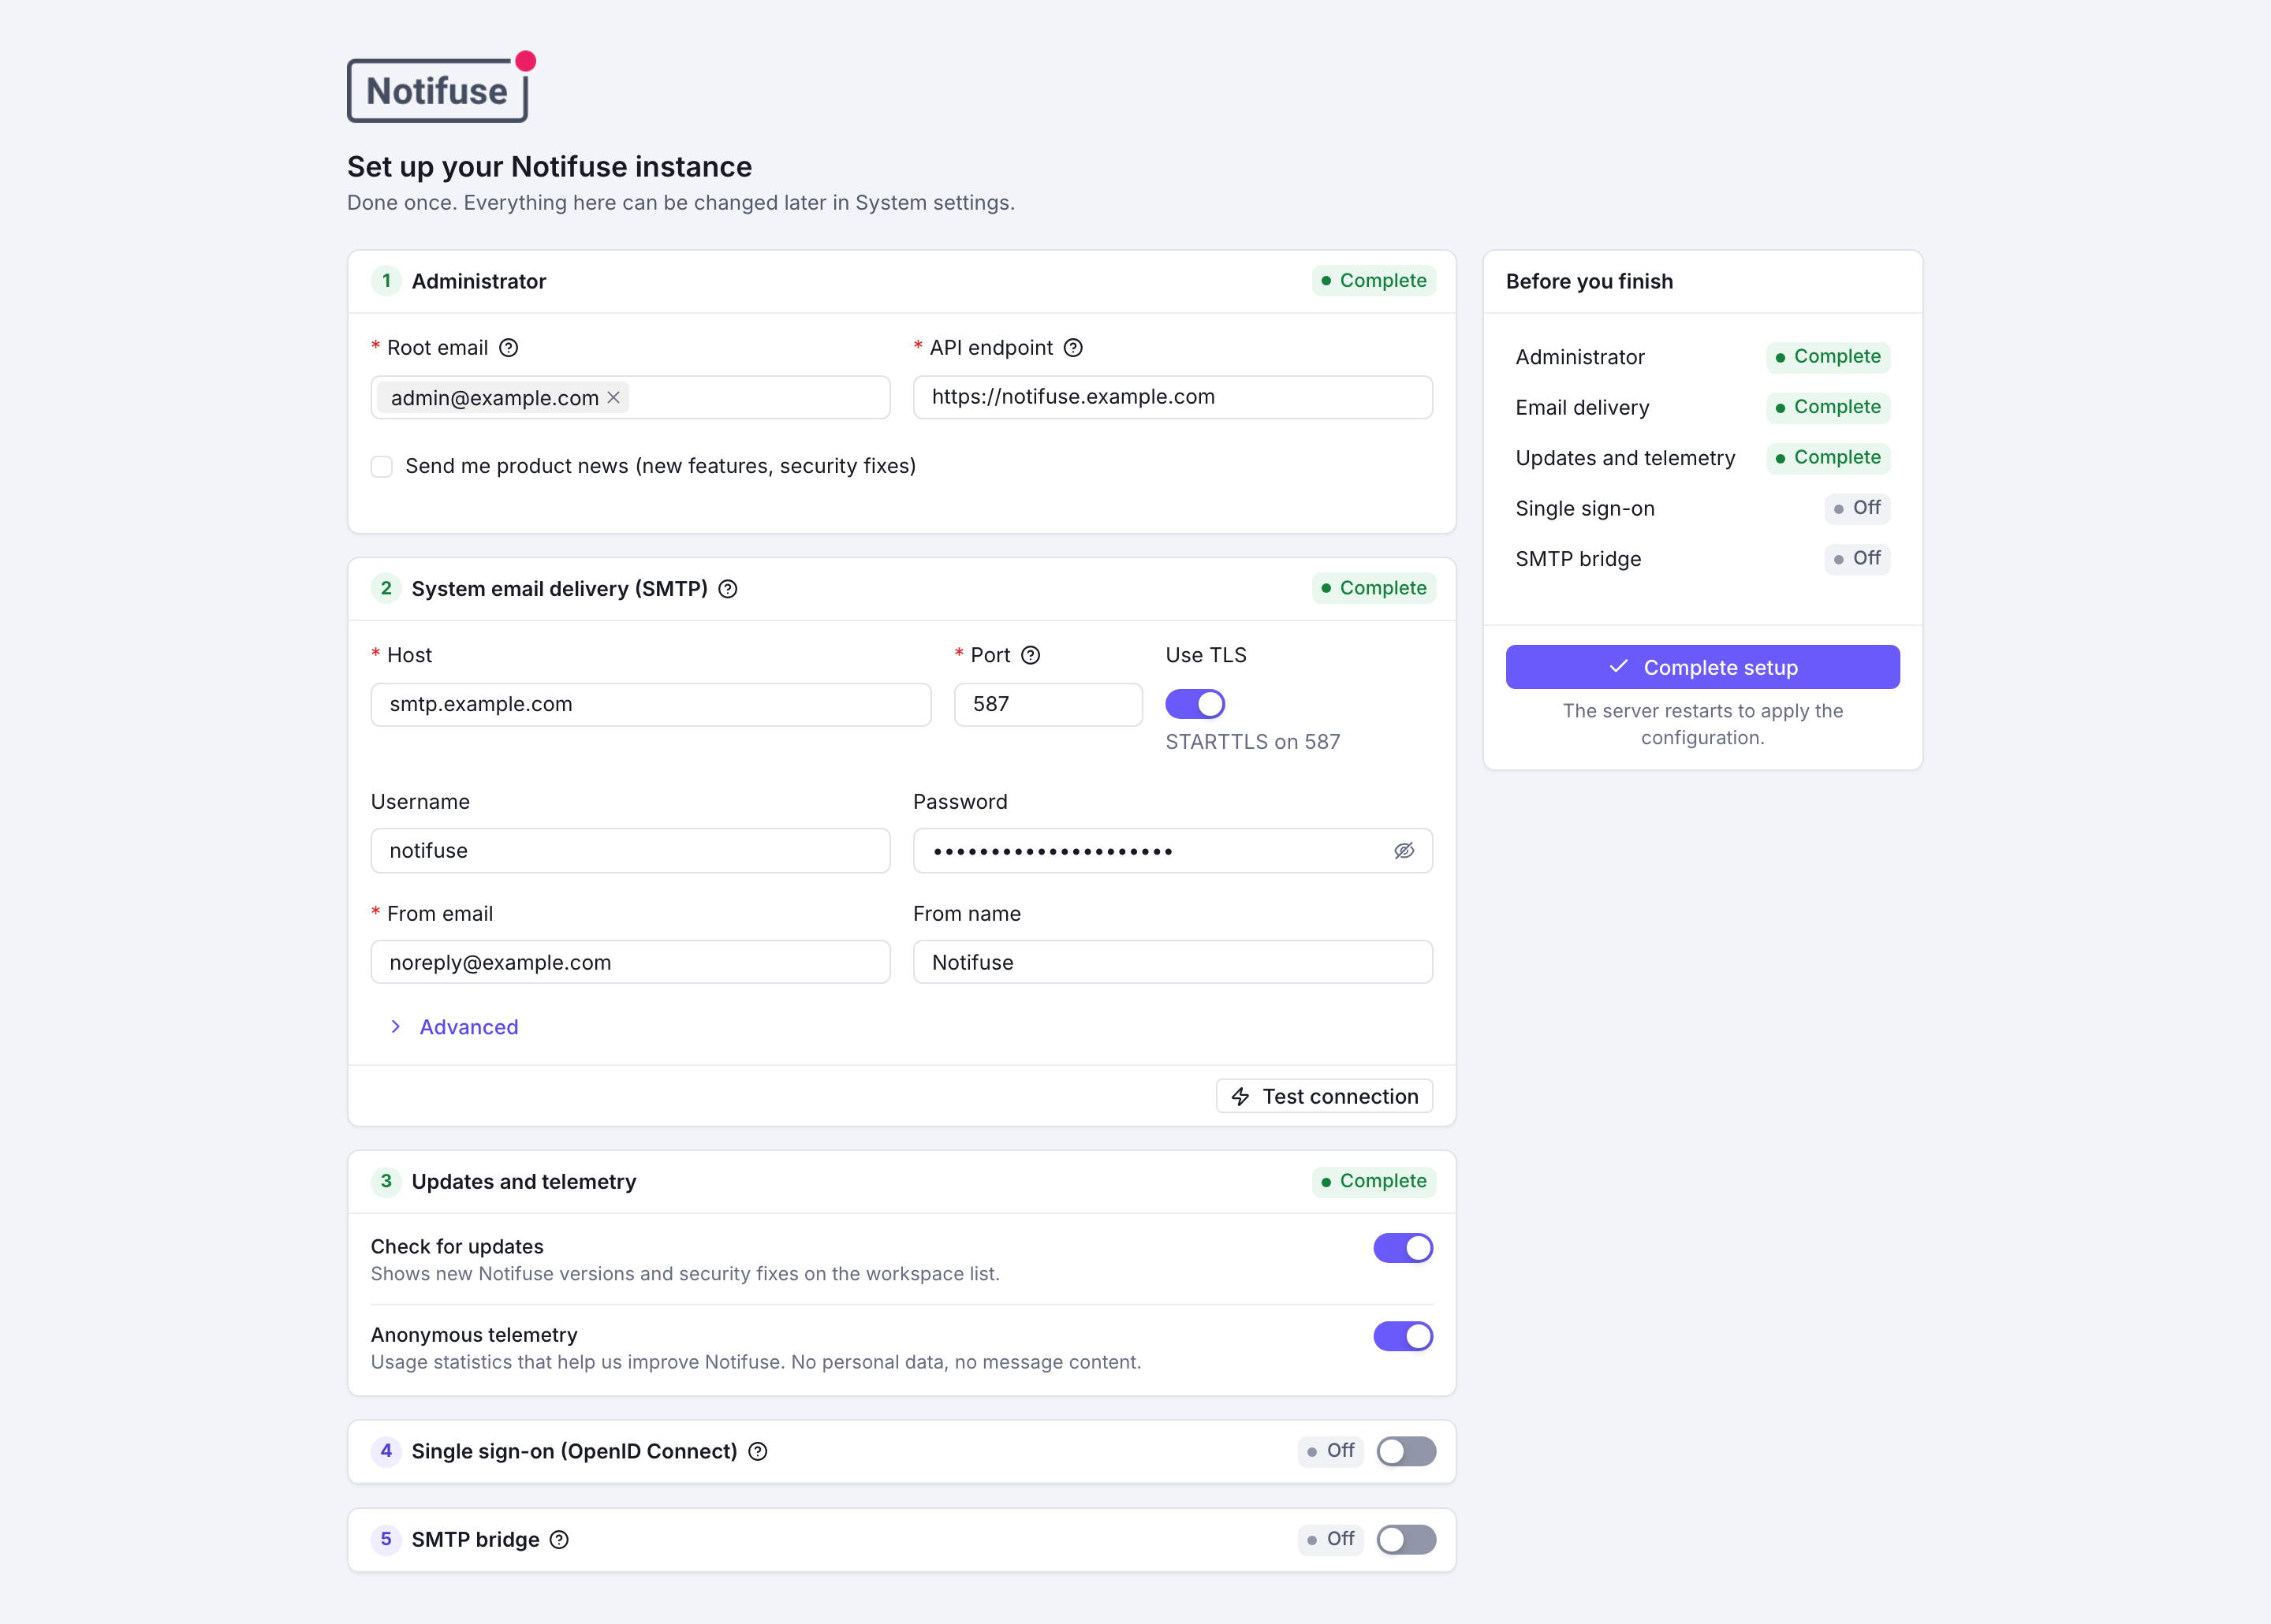
The setup wizard: administrator, system email delivery, updates and telemetry, single sign-on and SMTP bridge Sign in
Enter the first root email and click Send Magic Code. The code arrives through the SMTP server you set in the wizard. Type the 6-digit code and click Verify Code.
If no code arrives, the system SMTP settings are wrong. Check the server log with
docker compose logs -f api.Create a workspace
Setup creates no workspace, so the console opens on New workspace.
- Workspace Name: 3 to 32 characters.
- Workspace ID: generated from the name. It can only hold lowercase letters and numbers, at most 20, and it appears in URLs and API requests.
- Website URL: optional. Notifuse uses it to find your favicon.
Click Create Workspace. The workspace comes with a contact for you and a list called Test List that you are subscribed to. Only a root user can create workspaces, and an installation without a licence can have three.
Connect an email provider
The system SMTP from the wizard doesn’t send workspace emails. Each workspace connects its own provider.
Go to Settings, then Integrations under Sending. Click Add integration and pick your provider in the Email sending group.
Every provider asks for a Name, at least one sender (Add sender asks for an Email and a Name) and a Rate for marketing in emails per minute, 25 by default. Then fill in the provider’s own fields:
SMTP
- Host: your SMTP server’s name.
- Port: 587 for STARTTLS, 465 for TLS from the first byte, 25 unencrypted.
- Encryption: keep Use TLS on unless your server takes plain text.
- EHLO hostname: optional. It defaults to the host.
- Method: Username and password, or OAuth2 for a Microsoft 365 or Google Workspace mailbox.
- Username and Password: leave them empty for a server that takes mail without login.
See SMTP for OAuth2 and common servers.
Amazon SES
- Region: the AWS region where your verified identities are.
- Access key ID and Secret access key: of an IAM user allowed to send with SES.
- Tenant isolation: optional. It gives the workspace its own SES reputation and suppression list, and AWS bills it per tenant.
- Advanced: Configuration set and SES tenant, for names you manage yourself in AWS. Leave them empty.
See Amazon SES for the IAM permissions.
Click Save. For every provider except SMTP, Notifuse then registers webhooks at the provider, pointing at your API endpoint, so it learns about deliveries, bounces and complaints. If the card shows Webhooks not registered, click Register webhooks in its menu once the instance answers at its public address.
Choose what the provider sends
A new provider sends nothing until you give it a role. In the Email sending panel, pick it for Marketing emails (broadcasts and automation emails) and for Transactional emails (notifications sent through the API, Zapier or Supabase). Confirm each change with Yes.
The provider card’s menu has the same choices: Use for marketing and Use for transactional.
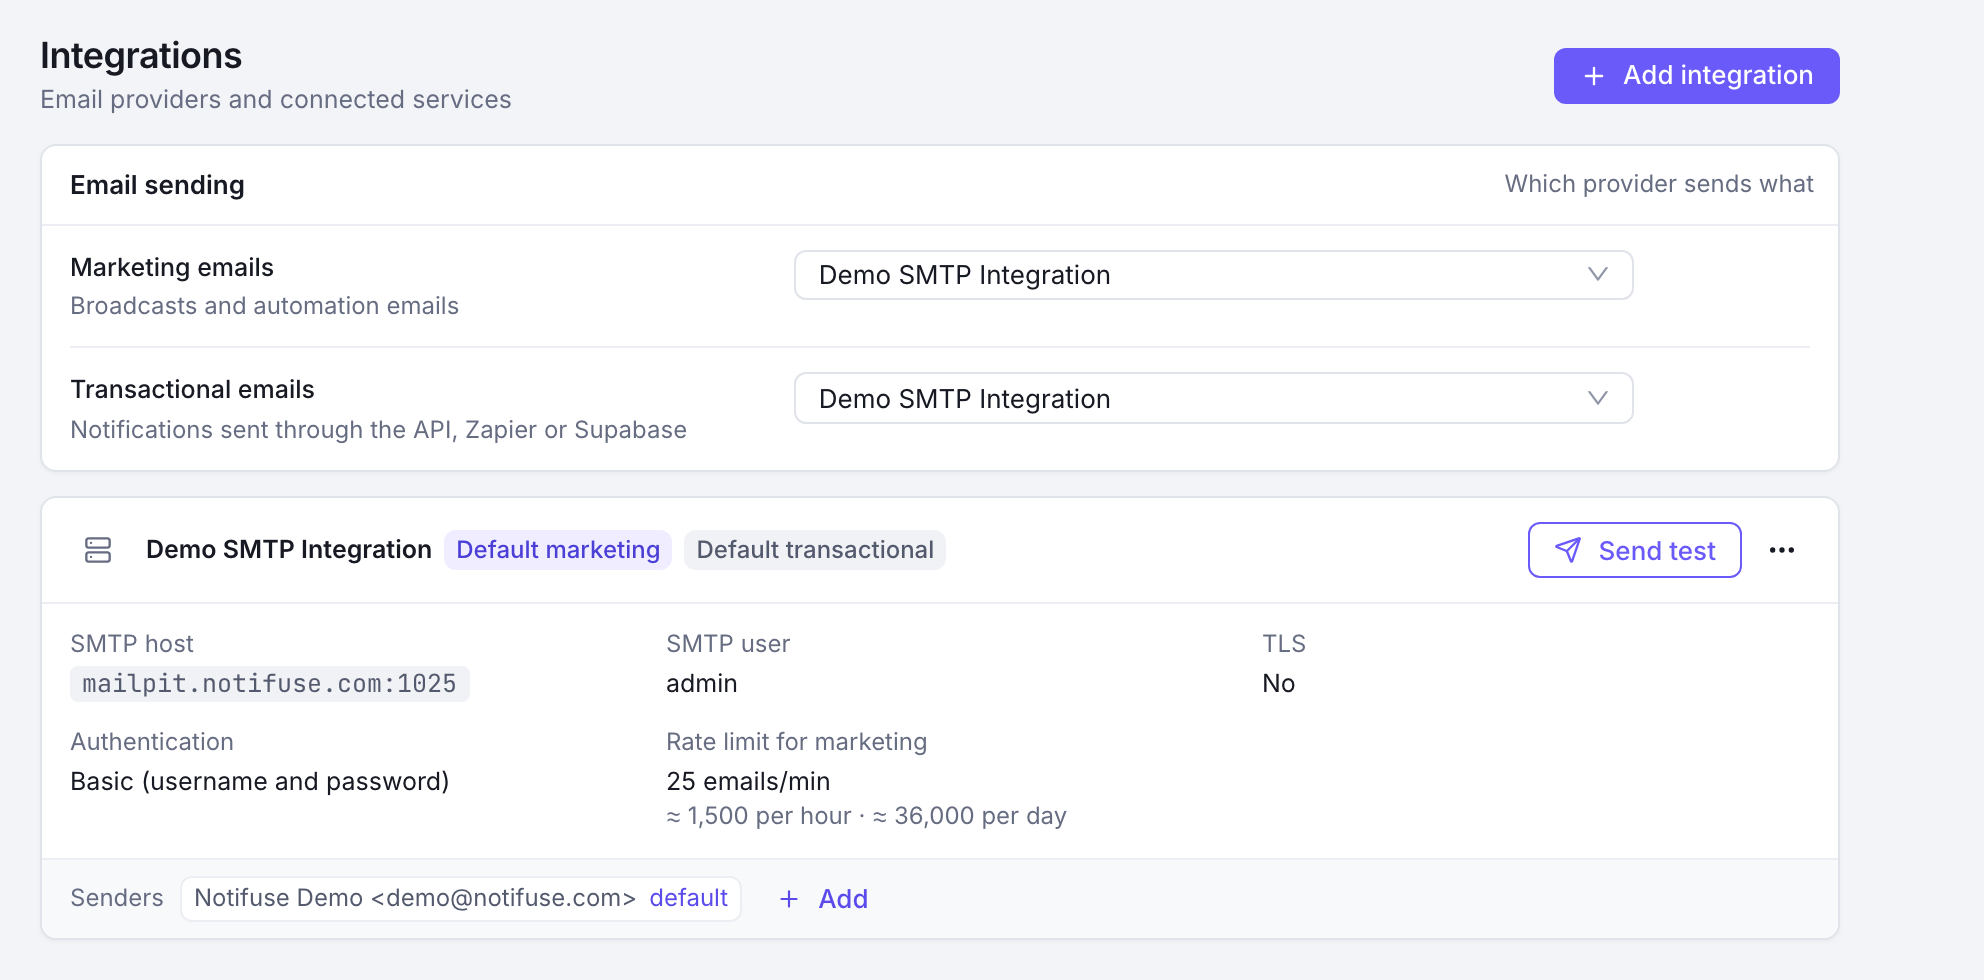
The Email sending panel with a provider chosen for marketing and transactional emails, above the provider card Send a test
Click Send test on the provider card. Enter your address in Send to and click Send test email.
Check that it works
- The test email is in your inbox. If it isn’t, check the spam folder, then the provider’s credentials and the sender address.
- In the Email sending panel, neither role shows Not set.
docker compose pslists theapiandpostgresservices as running.